
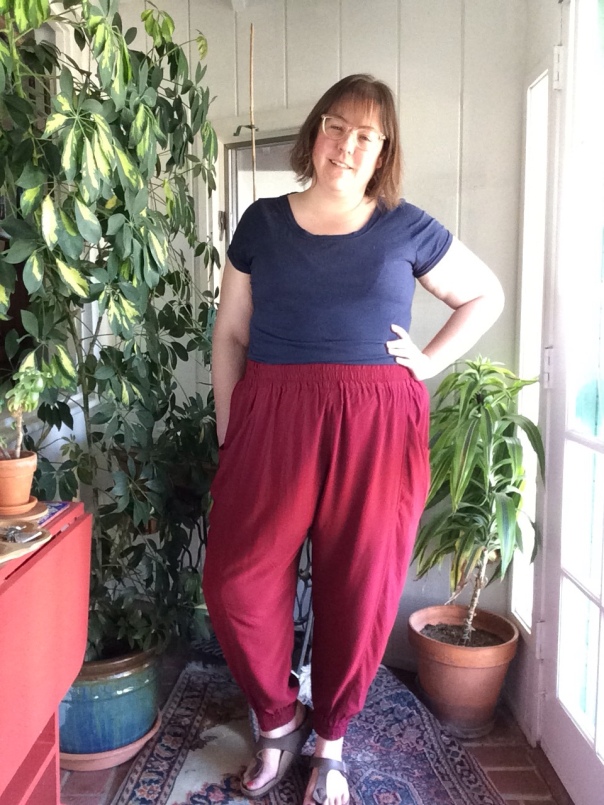
Now that I’ve finally worn the wearable muslin of my Sew Liberated Arenite Pants, its time to blog them! These weren’t without their challenges, but I ended up with some fun pants and know what I need to do next time to improve the fit. Meg teased this pants pattern on Instagram for what seemed like forever before it was released, so by the time it went live, I wasted no time in getting these sewn up! I just love the design, its so unique and fun!

My measurements put me pretty much exactly into the largest size, the 24, so I went ahead and cut that. And apparently, as I get older (or at least as I sew more pants), I get get wiser, so I did make one adjustment before cutting. I extended the back crotch curve by about an inch, adding a little to the inner thigh width above the knee as I did.
The pattern called for 3-2/3 yards of 54″ wide fabric for all sizes, so I went ahead and bought 4 yards of this 54″ wide Telio rayon challis from Fabric.com. This was not my favorite fabric to work with, its was way more delicate/shifty than many other rayon challis I’ve work with and it drove me nuts. But it worked well enough for the muslin.
Well, imagine my surprise when I finished cutting my fabric and had over a yard left! I thought I had made a major cutting error, but after successfully sewing the muslin and talking to many other sewists on Instagram about this, it seems there is either an error in the fabric requirements or an EXTRA lot of yardage is included for print matching. I feel completely comfortable saying that I easily cut the largest size of this pattern out of 2-2/3 yards of pre-washed fabric (as always, do account for shrinkage if you are buying a rayon). I am a little peeved about this since I had already gone ahead and bought a more expensive fabric for my “real” version and thats quite a few bucks I’m not going to get back, but the good news is that we can probably all go out and buy that pricey tencel twill we’ve been eyeing for our next pair of Arenite Pants! And, it served as a good reminder to always double check fabric requirements when they seem suspicious.

Anyways, look at those pockets. They are dream! However, the flat felled seams were a total nightmare in the rayon challis and I would 100% NOT recommend doing them. Faux flat felled for the win!

I have to say that I had some confusion with the notching, so I recommend paying an extra bit of attention. I am a notoriously horrible/lazy notcher, but it did seem to work out in the end. If you puzzle out how it all goes together with the paper pattern pieces and add a few notches of your own, you might have an easier time than I did. The pockets went to together clearly, my main confusion was over getting the side panels in the right way.

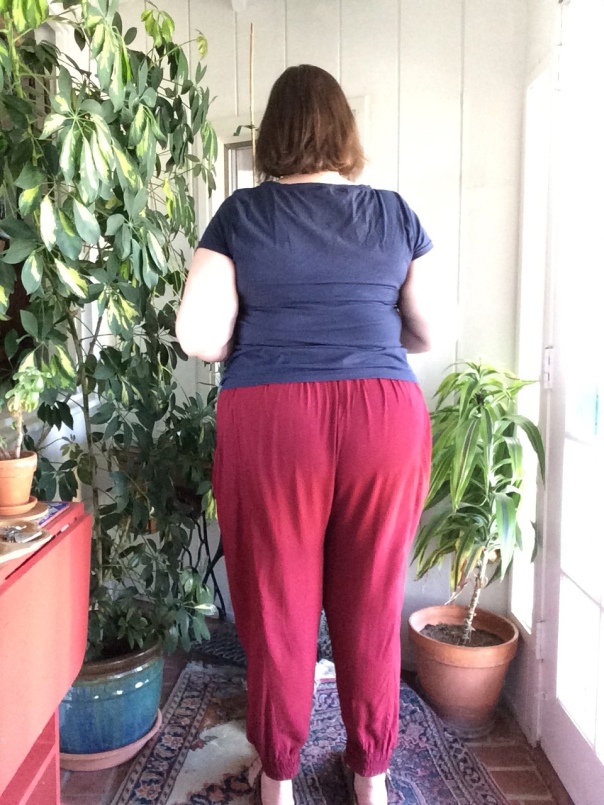
I tried them on a few times through construction but it was hard to tell how the fit was turning out until I put on the waistband. It turned out to be a major wedgie situation in the back. I scooped out the back crotch curve by about 2 inches and they became wearable, though I think I’m going to add at least another inch or two to the back rise before I make my next pair because they are still pulling a bit when I move around.

This back pattern piece reflects the changes made to this version: extra length on the back crotch and the scooped out crotch curve as indicated by the pencil line. Another change I will make to the next version is to add about 2″ in leg length. I meant to do that for this pair but I forgot before I cut the fabric. I thought it would be OK because the cropped length is cute, but the cuff restricts movement since it can’t move freely over my calf. I wore these to help my friend out with her 15 month old and there was a lot of pulling as I was chasing that little guy around!

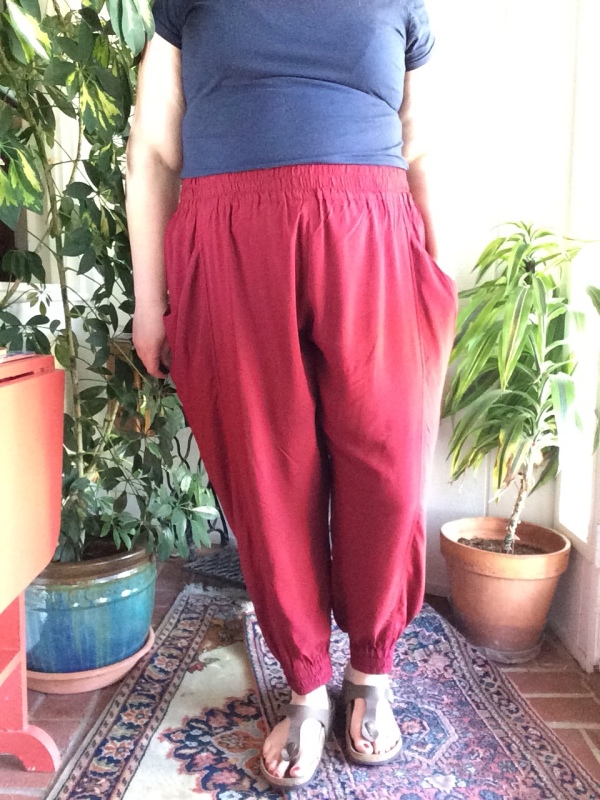
Another thing to note about the cuff is that dimensions for the elastic are not given. The pattern designer suggests that you have zero ease around the cuffs, but leaves it up to you. I would suggest for those of us on the larger end of the size range (or blessed with shapely calves) that zero ease will NOT work very well. They need to have a little extra ease for mobility so that they can slide up your leg a bit when moving around, IMO. Adding length to my next pair will help, but I’m not sure it will totally fix the issue.

Speaking of not giving dimensions, the length of waist elastic is not given either and I’m not sure I got it totally right. I understand why designers leave elastic lengths up to you, every elastic and every person is different, but it does bug me a bit because I’m not sure what I’m aiming for (like should these sit low on the hips or up higher?) and it makes it impossible when you are making something as a gift.
I know that sounds like a lot of little nit-picks, but all in all I love the pattern and I think my next pair will be practically perfect. I’m glad I muslined before I cut into my precious tencel. As always, feel free to let me know if you have any questions or need advice on making this pattern on the larger end of the size range.
Just the Facts:
Pattern: Sew Liberated Arenite Pants,
Size: 24 with a modified back crotch curve
Fabric/Notions: Telio rayon challis from Fabric.com, 2″ no-roll waistband elastic from Dritz bought at Joanns (two packages needed for this version in size 24)


Thank you for sharing your experience with this pattern!
LikeLike
Hope it was helpful for you!
LikeLike
Thank you for all that info.! I was wondering if I should do a muslin but you convinced me (I really don’t want to have a wedgie! haha)! Especially since I am planning to make them in raw silk, I think I would have cried if they didn’t fit! I probably bought way to much fabric also (and I should have listened to myself I thought there was no way I could need all that). It’s going to be my second pattern from that designer and her fabric requirements for the matcha top were very generous too. Now I know 🙂
LikeLike
Good luck, Claudia! I hope all of my experiences help you out. Your planned pants sounds lovely!
LikeLike
Hi Megan, thank you for the detailed review!
LikeLike
We are so on the same page. I have your exact measurements
I am currently working on my muslin for this exact pattern. And yes the back curve needs 2 extra inches. I am going to try to take some bulk out of the pocket. Not sure if I’m going to be successful. Thanks for all the info.
LikeLike
Hope your pants work out, Margie! Hopefully some fit adjustments will be the ticket. Good luck!
LikeLike