
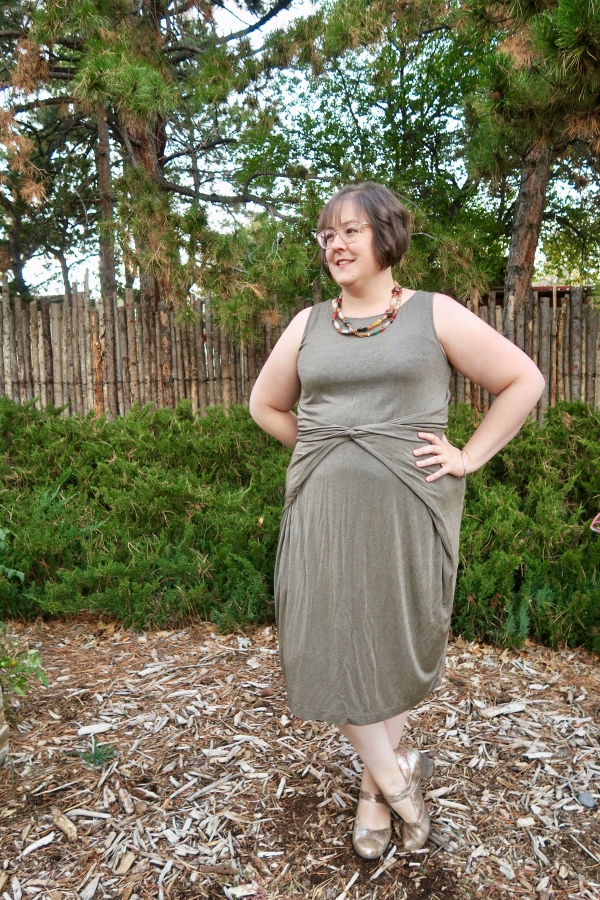
Maybe, like me, you’ve always lusted after a certain indie darling wrap dress, but were put off by the fact that you would have to grade it up multiple sizes to fit your body? And maybe you were also deterred by the fact that it is designed for wovens and for knits and wondered how it could possibly fit well through the shoulders and armholes in both fabrics? Well, I have got a tutorial for you!!

This isn’t a direct copy of the design, but rather a wrap dress hack that is inspired by that design that I have made specifically for knits. If you want to try a woven, you are on your own ;). If you don’t want to go to the trouble of hacking a pattern, you can get a very similar look from both the Cashmerette Pembroke and the Seamwork Lane dresses, but neither have the “wings” the Keilo has, they both just have ties that attach at the side seams. So if you want the look I have here, keep reading…
This tutorial assumes you have a pretty good understanding of dress construction, since I haven’t gone into details about the sewing portion, just the drafting. The first thing you are going to want is a well fitting tank dress pattern. I started with the Deer and Doe Givre dress, for which I detailed my fitting process in the previous post. If you don’t have a tank dress pattern you like (and I really can’t recommend the Givre Dress in the larger sizes), I would suggest hacking one from a t-shirt pattern you like. You will probably want to muslin that before proceeding with the hack, but if you want to throw caution to the wind then just jump on in.
You will need:
Craft Paper or swedish tracing paper
Tape
Pencil/Pen
Straight quilting ruler and french curve
Well fitting tank dress pattern
This is a simple pattern hack of a knit dress. I know that the proper way to hack/draft a pattern is to first remove the seam allowances, but I am going to be lazy and not do that. Thats how I did this hack initially and it all worked out fine because this is a knit pattern with small seam allowances. Before we get started, we will need to make a couple of design decisions. Named have a pretty good line drawing on their product page to give you an idea of how things go together on their pattern.

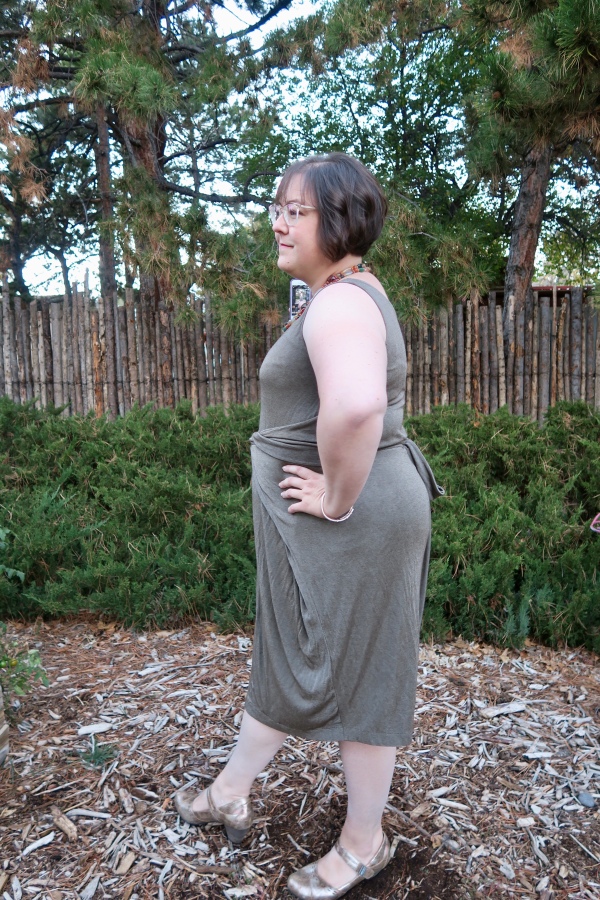
Since I knew I was drafting this for a knit, I decided to omit the front darts and back darts. I redrew the neckline on my pattern to be a bit higher, but kept the dipped neckline in the back from my original Givre pattern. I decided to keep it below the knee length because I wanted it to be wearable at multiple occasions, but you can do any length you would like. Modify both your length and neckline on your original pattern at this point if desired. I maintained the shaped back seam that I had added during my initial pattern fitting adjustments, but decided to omit the slit due to the shorter length. You can also modify this now if desired. You absolutely do not need a center back seam unless you are using it for fitting or to insert a vent.
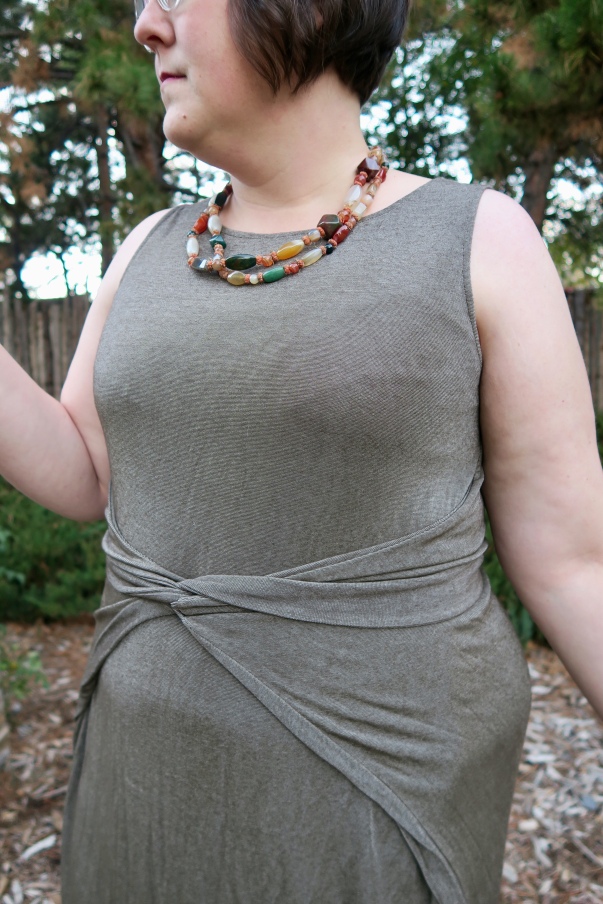
At this point, you will also have to decide if you want to deviate from the neck and arm hole finishing techniques used in your original pattern and adjust seam allowances accordingly. I wanted my straps to be narrower than my previous versions of this dress (which used bands for finishing), so I decided to omit the bands and just turn and stitch the 3/8″ seam allowance. Modify your armhole and neckline seam allowances on your original pattern at this point if needed (or just be risky like me and modify them as your are tracing the pattern, below). I couldn’t quite puzzle out how the armholes on the Kielo were finished so that they would transition well into the “wing” of the wrap and still have a nice looking armscye, so I did some further googling. I found this very detailed blog post that outlines how to hack the Keilo into a jumpsuit, which is very cool, and shows a lot of diagram of the pattern pieces. Unfortunately, this didn’t help me with figuring out how to cleanly finish the armhole as the original pattern designed, so I went my own way.

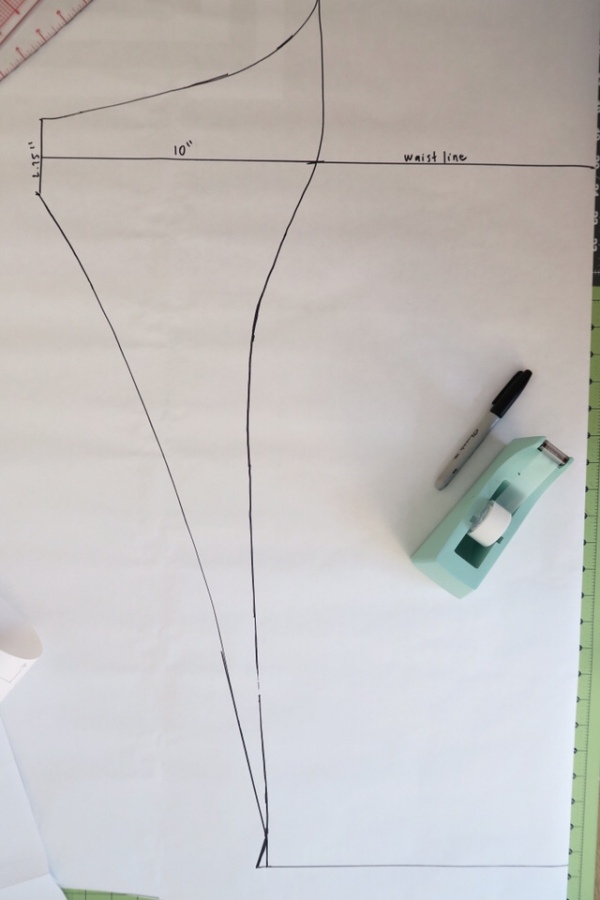
Cut yourself a large piece of craft paper, at least the length that you want your finished dress to be and a little more than twice the width of the tank dress pattern you are starting with. Tape it to the table. Trace your tank dress pattern onto your craft paper, making sure to trace your modified neckline if you so choose. This is my final front pattern piece after the alterations I did during my initial tank dress pattern fitting. The first two versions I made were shorter in length because I was testing fit, but this Givre dress is drafted to be below the knee and I traced it off at that length. Mark the waistline on your traced pattern piece. If it was not marked on your original pattern, you can hold it up to yourself and approximate. Like I said, this is a knit and I promise it will all work out.

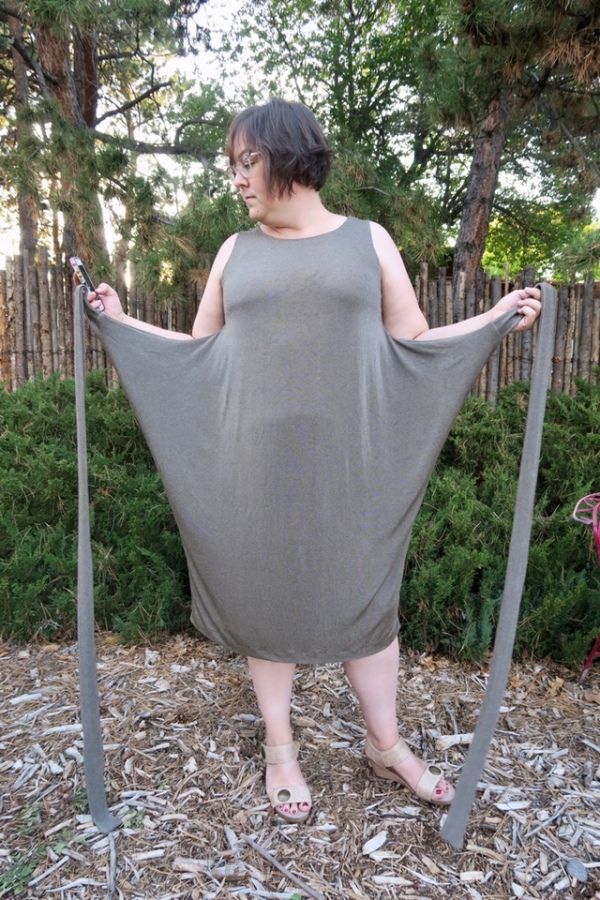
You want the wing portion of the wrap to meet in either your center front or center back, depending on how you wrap it, so I decided to extend the “wing” out 1/4 of my waist measurement. My waist measurement was 41″ when I drafted this, so I took 41/4=10.25″. Once again, I ignored seam allowances and just extended my waistline marking 10″ past the side seam of the original dress.

Now, you need to decide how wide you want your finished tie portion of the wrap to be. I went with 2″ and I recommend you do the same, but I’ll explain my math to you in case you want to differ. For this, we do need to pay attention to seam allowances briefly. You are going to finish the tie and then insert it into the dress after the side seams are sewn, so the opening left for that insertion needs to be your finished tie width plus the seam allowances times 2. So for my 2″ finished tie, I needed a finished gap of 2″, which means I needed to draft that hole 2″ plus 2 X a 3/8 SA or in plain terms, 2.75 inches wide. I drew a 2.75 inch wide line perpendicular to my waistline extension, centered at the waistline.

Instead of starting the wing as a continuation of the armhole, I decided to start it slightly below the armhole so that I would be able to finish it separately. This also keeps the dress more fitted through the upper bust, which I like. Mark the point you are going to start your wing, about 2″ down from the armscye.

Now, its time to connect the dots. I used my french curve to connect that “wing” starting point with the top edge of the perpendicular tie hole line.

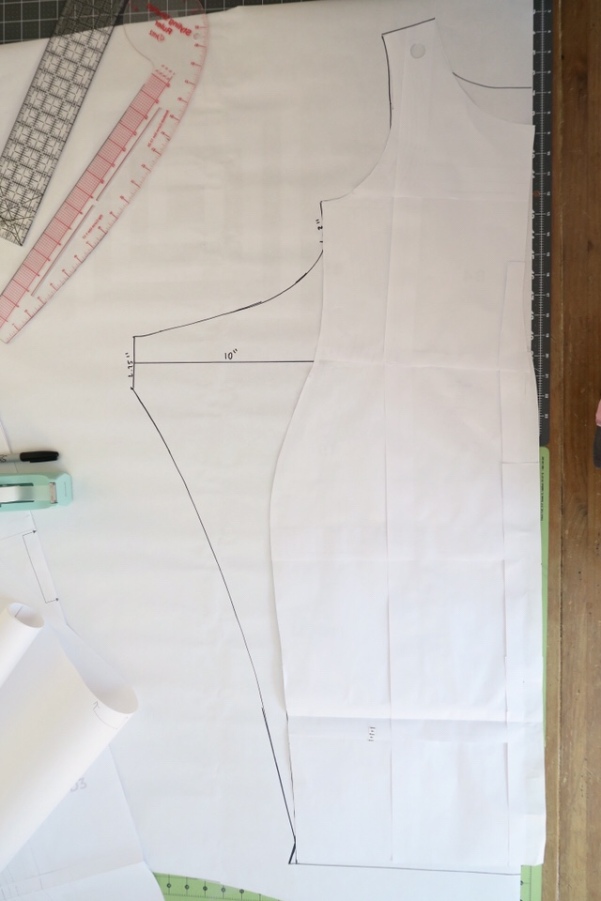
Then I traced from the bottom of the perpendicular line to the bottom of the hem of the original tank dress pattern, using the Keilo line drawings as a rough guide. Be sure to flare your line back out at the bottom to account for the turn of the hem. I went with a 1″ hem. Edited to add: Debbie Cook alerted me to this very helpful image that shows that the hem on the Keilo Dress is actually angled down to compensate for the side wrapping action. I will probably try this on my next version as it does look like I have a slight rise at the side seam on this version.
And, voila, you are all done with your front pattern piece. It should look like the image below. Since we never removed seam allowances, we don’t have to add them back in.

Cut out the front pattern piece and admire your work. Halfway there! Just kidding, you are almost done. Repeat the tracing steps for your back pattern piece using a fresh piece of craft paper. Overlay the newly drafted front pattern piece, lining up the underarm point of the armscye and the bottom hem. Trace the wing shape on the back pattern piece so that the front and back wings are identical. Mine lined up well and I hope this is the case for all patterns, but I’m not sure. You may have to do some finagling at the point. It was hard to get a picture of this step, so here is my original back pattern piece over my newly drafted front pattern piece to show how things should line up. You can see there may be some difference in the arm and necklines, and in my case there is a shaped center back seam, but the wings should be identical.
Cut our your back pattern piece and you are nearly done. The only thing left is the ties. As I mentioned above, I was going to for 2″ finished ties, so I drafted myself a rectangle that was 2″ plus 2 time the SA, or 2.75″ wide by 4 ft long, though you can pick any length you think will work. They ended up a little long but I wanted to have all the different wrapping options available to me. You will need to cut 4 of these, 2 per tie. I actually drafted this right onto the fabric so I don’t have any photos of pattern pieces.
If you are using bands to finish the neck and arm holes, you can simply use the pieces from your original pattern if you didn’t modify the shapes. If not, you are on your own to redraft those.

Now you are ready to sew! I’m just going to give a basic overview of construction, this post is long enough as is!
Construction:
- Sew center back seam, if needed.
- Sew front and back together, wrong sides together, along the wing edges, leaving a gap for the tie to be inserted along the 2.75″ perpendicular line.
- Finish neck and arm holes as desired. I serged a piece of clear elastic to the wrong side of the fabric to stabilize the knit, then turned and stitched a 3/8″ hem.
- Complete two ties, sewing your long strips together wrong sides together on 3 sides and turning right side out.
- Turn dress wrong side out, insert unfinished edge of the tie into the tie gap on the dress, so that the right side of the tie is facing the right side of the dress, raw edges of the tie gap and the tie together. Sew all 4 layers together. Repeat for second tie and turn dress right side out to make sure it all came together OK.
- Hem dress and enjoy!

Please let me know if you have any questions or if anything is unclear. If you would like to see a step by step photo tutorial for the construction, let me know. I’ve been meaning to make another dress and that would give me a great excuse to finally do it! And please, please, please tag me on instagram, leave me a note, or send me an email if you use this tutorial. I would love to see your finished projects!


Thanks for the tutorial! Your dress is lovely!
LikeLike
Thank you so much!
LikeLike
I’m excited to give this a try! Thanks
LikeLike
Great!! Hope it goes well
For you!
LikeLike
I love your thinking here. I gotta admit that I do this switch up a lot (where I like the details on one pattern but don’t want to grade up a new pattern, so I add those details to the TNT I have). I do it often enough that I tend to feel kinda guilty about this. So far I have assuaged my guilt in borrowing the deets from one indie pattern and buy another pattern from that designer that I might use. I want to support independent designers, and I get how hard it is to draft complicated something from scratch (god knows I’ve tried), but I Just Don’t See $25 worth of design on some things. I can spend $6 for a Vogue at Joanns and get three times as much value for something I don’t already have twenty copies of. How many pencil skirts are there in the universe? How many tank dresses? This is where I think the effort could really go into drafting a wide range of sizes of basic items, and then have ‘style point’ upgrade hack packs. That’s a company I think a lot of us could get behind. The Big Pattern Conglomerate has come close a couple of times, but close is not good enough. I think Cashmerette is on her way there. And if they had instructions that were aimed at the beginning sewist, that’s money in the bank.
LikeLike
Yes, such a great idea!! Hackable basics is where it’s at! TBH I used to feel a bit guilty about hacking things like this that are clearly inspired by another indie pattern, but not any more! If you don’t even come close to my size, you don’t get my money. I would have had to grade that Named pattern up nearly 10 inches. No way, not happening. Especially when everyone’s excuse for not having a larger size range is that they can’t just keep grading up their patterns, they need a new block. Well if they need a new block then so do I- and I will find it from a pattern designer that already fits my size 😉
LikeLiked by 1 person
Looks great Megan! I agree with not buying every pattern when you can hack a TNT, esp. if your size isn’t available. For your next one, have a look at this drawing … https://images.patternreview.com/sewing/patterns/named/Kielo/kielo_shorten.jpg … to see how the hem is actually not straight across but angled downward to allow for the uptake of tying the ties.
LikeLike
Thank you so much Debbie, that makes total sense and I don’t know why I didn’t think “that hem looks wonky”. I will update the post and try this on the next one!
LikeLike
GAAAAHHHHH!!!! I feel all kinds of love for this!! I’ve totally lusted after the kielo dress but worried about all the same things as you: sizing, knits/wovens, necklines. If they’re not going to make my size, I’m not going to buy it or grade it a million sizes. I love having instructions now for this; it makes me so happy. It’s empowering. Yay. 😀
LikeLike
Awesome!! Empowering, yes!! I hope it works out for you!
LikeLike
This is so clear and thorough, thank you! Also, the reason you can’t find any clear information about finishing the armscye cleanly, is that there’s no plan or way built into the pattern or directions. It’s sloppy and a pain in the butt, especially at that price point. Great hack and I love that stone/mushroom color!
LikeLike
That is so good to know about the original pattern. I was really scratching my head trying to figure it out. Glad I went my own way on that part, plus I like that it kept it fitted above the bust and kept the wrap part below the bust. Thanks so much!
LikeLike